目录
- 什么是 Docker?
- 核心概念解析
- 环境搭建
- 第一个容器:Hello World
- 镜像构建实战
- Docker Compose 多容器编排
- 生产环境部署
- 常见问题与排错
- 最佳实践总结
什么是 Docker?
Docker 是一个开源的容器化平台,它允许开发者将应用程序及其依赖打包成一个标准化的单元——容器,从而实现”一次构建,到处运行”。
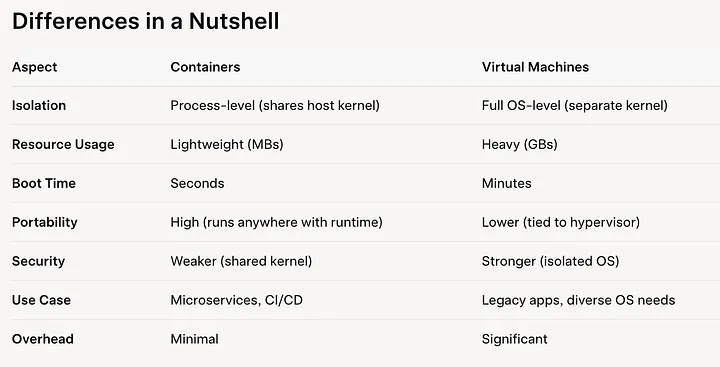
容器 vs 虚拟机
| 特性 |
Docker 容器 |
传统虚拟机 |
| 启动速度 |
秒级 |
分钟级 |
| 资源占用 |
共享宿主机内核,轻量 |
需要完整操作系统,笨重 |
| 性能 |
接近原生 |
有虚拟化开销 |
| 隔离级别 |
进程级隔离 |
操作系统级隔离 |
| 镜像大小 |
通常 MB 级别 |
通常 GB 级别 |
核心概念解析
1. 镜像(Image)
镜像是容器的只读模板,包含运行应用所需的代码、运行时、库和环境变量。
1
2
3
4
5
|
docker images
docker search nginx
|
2. 容器(Container)
容器是镜像的运行实例,可以被创建、启动、停止、删除。
1
2
3
4
5
6
7
8
|
docker run -d --name my-nginx nginx
docker ps
docker stop my-nginx
|
3. 仓库(Registry)
用于存储和分发镜像的服务,Docker Hub 是官方的公共仓库。
1
2
3
4
5
|
docker pull ubuntu:22.04
docker push username/image-name:tag
|
4. Dockerfile
定义镜像构建步骤的文本文件。
环境搭建
Linux (Ubuntu/Debian)
1
2
3
4
5
6
7
8
9
10
11
12
13
14
15
16
17
18
19
|
sudo apt-get update
sudo apt-get install apt-transport-https ca-certificates curl gnupg lsb-release
curl -fsSL https://download.docker.com/linux/ubuntu/gpg | sudo gpg --dearmor -o /usr/share/keyrings/docker-archive-keyring.gpg
echo "deb [arch=amd64 signed-by=/usr/share/keyrings/docker-archive-keyring.gpg] https://download.docker.com/linux/ubuntu $(lsb_release -cs) stable" | sudo tee /etc/apt/sources.list.d/docker.list > /dev/null
sudo apt-get update
sudo apt-get install docker-ce docker-ce-cli containerd.io docker-compose-plugin
docker --version
docker compose version
|
macOS
使用 Docker Desktop for Mac 一键安装。
Windows
使用 Docker Desktop for Windows,需要开启 WSL2 后端。
配置镜像加速(国内用户)
创建或编辑 /etc/docker/daemon.json:
1
2
3
4
5
6
7
| {
"registry-mirrors": [
"https://docker.mirrors.ustc.edu.cn",
"https://hub-mirror.c.163.com",
"https://mirror.baidubce.com"
]
}
|
重启服务:
1
| sudo systemctl restart docker
|
第一个容器:Hello World
输出示例:
1
2
3
| Hello from Docker!
This message shows that your installation appears to be working correctly.
...
|
运行一个实际的 Web 服务
1
2
3
4
5
6
|
docker run -d \
--name my-nginx \
-p 8080:80 \
-v /var/www/html:/usr/share/nginx/html \
nginx:latest
|
参数说明:
-d:后台运行(detached mode)--name:指定容器名称-p 8080:80:端口映射(宿主机8080 → 容器80)-v:挂载卷(数据持久化)
访问 http://localhost:8080 即可看到 Nginx 欢迎页面。
镜像构建实战
场景:构建一个 Node.js 应用镜像
项目结构:
1
2
3
4
5
| my-node-app/
├── Dockerfile
├── package.json
├── server.js
└── .dockerignore
|
server.js:
1
2
3
4
5
6
7
8
9
10
11
12
13
14
15
16
17
18
19
| const express = require('express');
const app = express();
const PORT = process.env.PORT || 3000;
app.get('/', (req, res) => {
res.json({
message: 'Hello from Docker!',
timestamp: new Date().toISOString(),
version: '1.0.0'
});
});
app.get('/health', (req, res) => {
res.status(200).json({ status: 'healthy' });
});
app.listen(PORT, () => {
console.log(`Server running on port ${PORT}`);
});
|
package.json:
1
2
3
4
5
6
7
8
9
10
| {
"name": "my-node-app",
"version": "1.0.0",
"scripts": {
"start": "node server.js"
},
"dependencies": {
"express": "^4.18.2"
}
}
|
编写 Dockerfile
1
2
3
4
5
6
7
8
9
10
11
12
13
14
15
16
17
18
19
20
21
22
23
24
25
26
27
28
29
|
FROM node:18-alpine
WORKDIR /app
COPY package*.json ./
RUN npm ci --only=production
COPY . .
RUN addgroup -g 1001 -S nodejs
RUN adduser -S nodejs -u 1001
USER nodejs
EXPOSE 3000
HEALTHCHECK --interval=30s --timeout=3s --start-period=5s --retries=3 \
CMD node -e "require('http').get('http://localhost:3000/health', (r) => r.statusCode === 200 ? process.exit(0) : process.exit(1))"
CMD ["node", "server.js"]
|
多阶段构建优化
1
2
3
4
5
6
7
8
9
10
11
12
13
14
15
16
|
FROM node:18-alpine AS builder
WORKDIR /app
COPY package*.json ./
RUN npm ci
COPY . .
RUN npm run build
FROM node:18-alpine AS production
WORKDIR /app
COPY --from=builder /app/dist ./dist
COPY --from=builder /app/node_modules ./node_modules
COPY package.json ./
EXPOSE 3000
CMD ["node", "dist/server.js"]
|
构建和运行
1
2
3
4
5
6
7
8
9
10
11
12
13
14
15
16
17
18
|
docker build -t my-node-app:1.0.0 .
docker images | grep my-node-app
docker run -d \
--name node-app \
-p 3000:3000 \
-e NODE_ENV=production \
my-node-app:1.0.0
docker logs -f node-app
curl http://localhost:3000
|
Docker Compose 多容器编排
场景:部署 Web 应用 + 数据库 + Redis
docker-compose.yml:
1
2
3
4
5
6
7
8
9
10
11
12
13
14
15
16
17
18
19
20
21
22
23
24
25
26
27
28
29
30
31
32
33
34
35
36
37
38
39
40
41
42
43
44
45
46
47
48
49
50
51
52
53
54
55
56
57
58
59
60
61
62
63
64
65
66
67
68
69
70
71
72
73
74
75
76
77
78
| version: '3.8'
services:
app:
build:
context: ./app
dockerfile: Dockerfile
container_name: web-app
restart: unless-stopped
ports:
- "3000:3000"
environment:
- NODE_ENV=production
- DATABASE_URL=postgres://user:password@db:5432/myapp
- REDIS_URL=redis://redis:6379
depends_on:
- db
- redis
networks:
- app-network
healthcheck:
test: ["CMD", "curl", "-f", "http://localhost:3000/health"]
interval: 30s
timeout: 10s
retries: 3
db:
image: postgres:15-alpine
container_name: postgres-db
restart: unless-stopped
environment:
POSTGRES_USER: user
POSTGRES_PASSWORD: password
POSTGRES_DB: myapp
volumes:
- postgres_data:/var/lib/postgresql/data
- ./init.sql:/docker-entrypoint-initdb.d/init.sql
ports:
- "5432:5432"
networks:
- app-network
redis:
image: redis:7-alpine
container_name: redis-cache
restart: unless-stopped
volumes:
- redis_data:/data
command: redis-server --appendonly yes
networks:
- app-network
nginx:
image: nginx:alpine
container_name: nginx-proxy
restart: unless-stopped
ports:
- "80:80"
- "443:443"
volumes:
- ./nginx.conf:/etc/nginx/nginx.conf:ro
- ./ssl:/etc/nginx/ssl:ro
depends_on:
- app
networks:
- app-network
volumes:
postgres_data:
redis_data:
networks:
app-network:
driver: bridge
|
nginx.conf:
1
2
3
4
5
6
7
8
9
10
11
12
13
14
15
16
17
18
19
20
21
22
23
24
25
26
27
28
29
30
31
32
33
34
35
36
37
38
39
40
41
42
43
44
45
46
47
48
| events {
worker_connections 1024;
}
http {
upstream app {
server app:3000;
}
server {
listen 80;
server_name example.com;
return 301 https://$server_name$request_uri;
}
server {
listen 443 ssl http2;
server_name example.com;
ssl_certificate /etc/nginx/ssl/cert.pem;
ssl_certificate_key /etc/nginx/ssl/key.pem;
add_header X-Frame-Options "SAMEORIGIN" always;
add_header X-Content-Type-Options "nosniff" always;
add_header X-XSS-Protection "1; mode=block" always;
location / {
proxy_pass http://app;
proxy_http_version 1.1;
proxy_set_header Upgrade $http_upgrade;
proxy_set_header Connection 'upgrade';
proxy_set_header Host $host;
proxy_set_header X-Real-IP $remote_addr;
proxy_set_header X-Forwarded-For $proxy_add_x_forwarded_for;
proxy_set_header X-Forwarded-Proto $scheme;
proxy_cache_bypass $http_upgrade;
}
location ~* \.(js|css|png|jpg|jpeg|gif|ico|svg)$ {
expires 1y;
add_header Cache-Control "public, immutable";
}
}
}
|
常用 Compose 命令
1
2
3
4
5
6
7
8
9
10
11
12
13
14
15
16
17
18
19
20
|
docker compose up -d
docker compose ps
docker compose logs -f app
docker compose restart app
docker compose down
docker compose down -v
docker compose up -d --build
|
生产环境部署
1. 使用 Docker Swarm(轻量级集群)
1
2
3
4
5
6
7
8
9
|
docker swarm init
docker stack deploy -c docker-compose.yml myapp
docker stack ps myapp
docker service ls
|
2. 使用 Kubernetes(大规模生产)
deployment.yaml:
1
2
3
4
5
6
7
8
9
10
11
12
13
14
15
16
17
18
19
20
21
22
23
24
25
26
27
28
29
30
31
32
33
34
35
36
37
38
39
40
41
42
43
44
45
46
47
48
49
50
51
52
53
54
55
| apiVersion: apps/v1
kind: Deployment
metadata:
name: web-app
labels:
app: web
spec:
replicas: 3
selector:
matchLabels:
app: web
template:
metadata:
labels:
app: web
spec:
containers:
- name: app
image: my-registry/my-node-app:1.0.0
ports:
- containerPort: 3000
env:
- name: NODE_ENV
value: "production"
resources:
requests:
memory: "128Mi"
cpu: "100m"
limits:
memory: "512Mi"
cpu: "500m"
livenessProbe:
httpGet:
path: /health
port: 3000
initialDelaySeconds: 30
periodSeconds: 10
readinessProbe:
httpGet:
path: /health
port: 3000
initialDelaySeconds: 5
periodSeconds: 5
---
apiVersion: v1
kind: Service
metadata:
name: web-service
spec:
selector:
app: web
ports:
- port: 80
targetPort: 3000
type: LoadBalancer
|
3. CI/CD 集成(GitHub Actions)
.github/workflows/docker-build.yml:
1
2
3
4
5
6
7
8
9
10
11
12
13
14
15
16
17
18
19
20
21
22
23
24
25
26
27
28
29
30
31
32
33
34
35
36
37
38
39
40
41
| name: Build and Deploy
on:
push:
branches: [main]
tags: ['v*']
jobs:
build:
runs-on: ubuntu-latest
steps:
- uses: actions/checkout@v4
- name: Set up Docker Buildx
uses: docker/setup-buildx-action@v3
- name: Login to Registry
uses: docker/login-action@v3
with:
registry: ghcr.io
username: ${{ github.actor }}
password: ${{ secrets.GITHUB_TOKEN }}
- name: Docker meta
id: meta
uses: docker/metadata-action@v5
with:
images: ghcr.io/${{ github.repository }}
tags: |
type=ref,event=branch
type=semver,pattern={{version}}
- name: Build and push
uses: docker/build-push-action@v5
with:
context: .
push: true
tags: ${{ steps.meta.outputs.tags }}
labels: ${{ steps.meta.outputs.labels }}
cache-from: type=gha
cache-to: type=gha,mode=max
|
常见问题与排错
问题1:容器无法启动
1
2
3
4
5
6
7
8
|
docker logs container-name
docker run -it --rm image-name /bin/sh
docker inspect container-name
|
问题2:端口冲突
1
2
3
4
5
|
sudo netstat -tulpn | grep :80
docker run -p 8080:80 nginx
|
问题3:权限问题
1
2
3
4
5
6
|
sudo usermod -aG docker $USER
newgrp docker
docker run --user $(id -u):$(id -g) -v $(pwd):/app image-name
|
问题4:镜像过大
优化策略:
- 使用 Alpine 基础镜像
- 多阶段构建
- 清理缓存和临时文件
- 使用 .dockerignore
1
2
3
4
5
6
7
8
|
node_modules
npm-debug.log
.git
.env
*.md
.dockerignore
Dockerfile
|
最佳实践总结
| 实践 |
说明 |
| 使用特定版本标签 |
避免使用 latest,使用 nginx:1.24.0 |
| 多阶段构建 |
减小最终镜像体积 |
| 非 root 用户运行 |
提升安全性 |
| 健康检查 |
确保服务可用性 |
| 资源限制 |
设置 CPU/内存限制 |
| 日志管理 |
配置日志轮转和收集 |
| 密钥管理 |
使用 Docker Secrets 或环境变量注入 |
避免做的
- 在容器中存储数据(使用卷)
- 一个容器运行多个进程
- 将敏感信息硬编码在镜像中
- 忽略安全更新
常用命令速查表
1
2
3
4
5
6
7
8
9
10
11
12
13
14
15
16
17
18
19
20
21
|
docker images
docker rmi image-id
docker prune
docker ps -a
docker rm container-id
docker exec -it container /bin/sh
docker network ls
docker network inspect bridge
docker volume ls
docker volume rm volume-name
docker system df
docker system prune -a
|
结语
Docker 已经成为现代软件开发和部署的标准工具。通过本文的学习,你应该掌握了:
- Docker 核心概念和工作原理
- 镜像构建的最佳实践
- 多容器编排的 Compose 使用
- 生产环境的部署策略
- 常见问题的排查方法